#odoo action menu
Explore tagged Tumblr posts
Visit Tumblr Blog
Explore Tumblr blogs with no restrictions, modern design and the best experience.
Last Seen Tumblr Blogs


Fun Fact
Premium Tumblr themes are available from anywhere between $9 to $49.
Text
Step-by-Step Guide to Setting Up Odoo Learning Management System (LMS)
Odoo offers a powerful eLearning module that allows businesses, educators, and trainers to manage courses, lessons, quizzes, and certifications in one place. Whether you're setting up a training portal for employees or an online academy for learners, Odoo makes it easy to organize and deliver high-quality content. This step-by-step guide will walk you through how to set up your Odoo Learning Management System.
Step 1: Install the eLearning Module
To begin, you need to install the eLearning app in Odoo:
Log in to your Odoo backend with administrator rights.
Go to the Apps module.
Search for eLearning or a Learning Management System.
Click Install on the eLearning module.
Once installed, you will see a new menu called eLearning or Courses on your dashboard.
Step 2: Create a Course
After installing the module, the next step is to create your first course:
Navigate to the eLearning app.
Click Create to add a new course.
Fill in the basic course details:
Title: Name of your course.
Responsible: Assign a person or department.
Description: Write an overview of what the course covers.
Tags: Add categories to group similar courses.
Turn on or off features like Forums, Quizzes, and Certifications as needed.
Once done, click Save.
Step 3: Add Course Content (Lessons)
Courses in Odoo are structured with lessons or content blocks. Here's how to add them:
Open the course you created.
Scroll down to the Content tab.
Click Add Content.
Choose the type of content:
Document (PDF, Word files)
Video (YouTube or upload)
Quiz
Web Page (HTML content)
Enter a title, upload your content, and add any notes or instructions.
You can reorder lessons using drag and drop to match your preferred sequence.
Step 4: Create Quizzes
Quizzes help reinforce learning. To create one:
Go to the Content section of a course.
Click Add Content and select Quiz.
Name the quiz and add a short introduction if needed.
In the Questions tab, click Add a Question.
Choose question type:
Multiple choice
Single choice
Text input
Add answers and mark the correct one(s).
Quizzes can be scored, and you can define passing criteria.
Step 5: Set Up Certification (Optional)
You can provide certificates for course completion:
In the course form, enable the Certification option.
Define the criteria (e.g., complete all lessons or pass the final quiz).
Choose a certification template or create your own.
Certificates will be auto-generated and available for download in the learner's portal.
Step 6: Assign Courses to Users
You can assign users manually or allow them to enrol via the website.
Manual Assignment:
Go to the course.
Under the Participants tab, click Add.
Select users from the list.
Public Access:
Make the course Published.
Set the course as Free or Paid.
Share the link with users or embed it on your site.
Step 7: View Learner's Progress
Track how learners are engaging with your courses:
Go to the eLearning dashboard.
Click on Reports.
View:
Course completions
Quiz scores
Certification status
Time spent on lessons
You can also export reports in Excel or PDF for sharing.
Step 8: Customize the Learning Portal
Odoo allows customization of the portal interface:
Go to Website > eLearning.
Use Odoo's website builder tools to:
Customize fonts, colours, and banners
Organize course listings by categories
Add filters and search options
You can also add a blog, testimonials, or FAQ section to support learners.
Step 9: Enable Email Notifications
Keep learners informed with automated notifications:
Use Automated Actions or Marketing Automation to:
Send welcome emails
Notify learners of new content
Remind about upcoming quizzes or deadlines
Set the conditions and templates for each scenario.
Step 10: Monitor and Improve
After setup, continue improving your LMS:
Collect feedback using forms or surveys.
Analyze popular courses and content.
Update lessons regularly based on learner performance.
Offer new certifications or advanced training.
Conclusion
Odoo Learning Management System is a flexible and user-friendly tool to train employees, teach students, or deliver professional courses. With features like quizzes, certificates, progress tracking, and detailed reporting, you can build a complete learning platform that fits your business needs. Follow these steps to get started and make learning accessible, engaging, and effective for everyone involved.
#odoo learning#odoo learning software#odoo learning software management#Odoo eLearning management software#odoo#odoo app#odoo erp
1 note
·
View note
Text
How to Create and Manage Users in Odoo

Odoo is a powerful and flexible ERP (Enterprise Resource Planning) system that enables businesses to manage their operations seamlessly. One of the key features of Odoo ERP is user management, which allows businesses to assign roles, control access, and monitor user activities efficiently. Proper user management in Odoo ensures that employees only have access to the modules and features relevant to their job roles, enhancing both security and productivity.
In this blog, we will provide a step-by-step guide on how to create and manage users in Odoo, covering everything from user creation to permission management and best practices.
Why is User Management Important in Odoo?
Before diving into the steps, let's understand why user management in Odoo ERP is crucial:
Enhanced Security: Restricts unauthorized access to sensitive business data.
Improved Efficiency: Ensures employees can access only the necessary features, reducing confusion.
Better Accountability: Tracks user activities and logs actions for transparency.
Customizable Access Control: Assigns specific roles to different departments, maintaining operational hierarchy.
Steps to Create a New User in Odoo
Follow these simple steps to add a new user in Odoo:
Step 1: Log in to Odoo as an Administrator
Before creating a new user, ensure you are logged in with Administrator privileges.
Step 2: Navigate to the Users Menu
Click on Settings from the main dashboard.
Under the Users & Companies section, click on Users to view the list of existing users.
Step 3: Click on Create New User
Click the Create button to add a new user.
Enter the following details:
Name: The full name of the user.
Email Address: The official email to be used for login.
Access Rights: Assign the appropriate access level (Administrator, Manager, User, etc.).
Password: Odoo can generate an email invitation where the user can set their password.
Step 4: Assign User Roles and Permissions
Odoo provides predefined roles, such as:
Administrator: Full access to all modules and settings.
Manager: Limited admin rights to manage specific modules.
Employee: Basic access to perform daily tasks.
Portal User: Limited access for external stakeholders.
Choose the appropriate permissions based on the employee’s role and department.
Step 5: Save and Send an Invitation Email
Click Save to register the user in the system.
Enable Send an Invitation to automatically send an email to the user with login details.
Managing Users in Odoo
Once a user is created, administrators can modify, manage, and control their access as required.
1. Editing User Details
Navigate to Settings > Users.
Click on the user’s profile.
Modify details like email, department, role, and access rights.
Click Save after making the necessary changes.
2. Assigning and Modifying Access Rights
Access rights define what a user can see and do in Odoo.
Under the Access Rights tab, you can assign or modify permissions for modules such as:
Sales (e.g., Sales Manager, Sales User, etc.)
Accounting (e.g., Accountant, Auditor, etc.)
HR & Payroll (e.g., HR Officer, Employee, etc.)
Inventory (e.g., Stock Manager, Warehouse User, etc.)
Assign appropriate rights to control data access and prevent unauthorized actions.
3. Deactivating or Deleting Users
When an employee leaves the organization or no longer needs access to Odoo, you may need to deactivate or delete their account.
How to Deactivate a User
Navigate to Settings > Users.
Click on the user profile you want to deactivate.
Toggle the Active status to Inactive.
This prevents the user from logging in but retains their data in the system.
How to Delete a User
Before deleting a user, ensure they don’t have any linked records (e.g., sales orders, invoices, etc.).
Navigate to Settings > Users.
Select the user and click on Action > Delete.
Note: Odoo does not allow deleting a user with assigned tasks or records. Instead, you can deactivate the account.
Best Practices for User Management in Odoo
To ensure smooth and secure Odoo user management, follow these best practices:
Use Role-Based Access Control (RBAC): Assign only the necessary permissions to users based on their job roles.
Regularly Update User Roles: As employees change roles or responsibilities, update their access rights accordingly.
Enable Two-Factor Authentication (2FA): Enhances security by requiring an extra layer of verification.
Audit User Activity Logs: Periodically check the system logs to track user activity and identify any unusual access patterns.
Limit Administrator Access: Grant admin privileges only to authorized personnel to prevent accidental system modifications.
Deactivate Inactive Users: Regularly review and disable accounts that are no longer in use to prevent security risks.
Conclusion
Creating and managing users in Odoo ERP is an essential task that ensures smooth business operations while maintaining security. By following the steps outlined above, businesses can efficiently add new users, assign appropriate permissions, and manage user roles effectively.
If you need expert Odoo implementation or customized Odoo ERP solutions, get in touch with Odiware Technologies today!
Contact Odiware for Odoo ERP Services
📞 Phone: +91 86608 65440 📧 Email: [email protected] 🌐 Website: www.odiware.com
0 notes
Text
How to Customize Odoo ERP to Fit Your Business Needs
Odoo ERP is among the most adaptable and customized ERP software available today. Businesses across industries use Odoo's modular framework to adjust the software to their individual needs. Odoo easily customizes workflow automation, reporting, and UI upgrades to boost business operations. In this article, we'll look at how to adapt Odoo ERP to meet your specific business requirements.
1. Understanding Your Business Requirements
Before you start customizing Odoo, you should first examine your business processes, identify pain areas, and set critical objectives. Consider the following questions: - Which essential business functions need improvement?
Are there any manual processes that can be automated?
What integrations are necessary to ensure seamless operations? Once you have a clear grasp of your needs, you may select the appropriate Odoo modules and customization choices.
2. Choosing the Right Odoo Modules
Odoo provides a wide range of modules, including CRM, Sales, Accounting, Inventory, HR, Manufacturing, and more. You can select modules that are relevant to your business operations and further personalize them based on your workflow.
3. Customizing Odoo Workflows
Odoo enables organizations to customize workflows to better fit their operations. Some important customizing choices include:
Automating approval procedures for sales, purchases, and bills.
Configuring multi-step inventory processes to match your logistics workflow.
Developing custom triggers and actions to automate repetitive chores.
4. Modifying the Odoo User Interface (UI)
Your team's usability and efficiency can be improved by customizing the Odoo user interface. Customization possibilities include:
Adding and deleting fields from forms and dashboards.
Rearranging menus and visuals to improve navigation.
Using bespoke themes and branding to ensure consistency
5. Developing Custom Odoo Modules
Custom module development is an excellent choice for firms that demand capabilities beyond what regular Odoo ERP features provide. Developers can create bespoke modules to:
Add features that are unique to your industry.
Improve existing features in sales, accounting, or inventory.
Integrate with third-party applications, such as payment gateways, shipping suppliers, and e-commerce sites.
6. Integrating Third-Party Applications
Odoo enables API interfaces, which enable organizations to interact with other software applications. Whether you need to sync data with an external CRM, e-commerce store, or marketing automation tool, integrating third-party applications guarantees that data is exchanged and processes are automated.
Read More:
0 notes
Text
Odoo 17 has a very strong accounting module that works really well with other main features of the system. This close connection helps make financial tasks easier and ensures that data is accurate throughout your business. Millions of businesses of different sizes and industries have already invested in Odoo ERP development to streamline their processes, mainly their accounting tasks.
Features of Odoo 17 Accounting Software
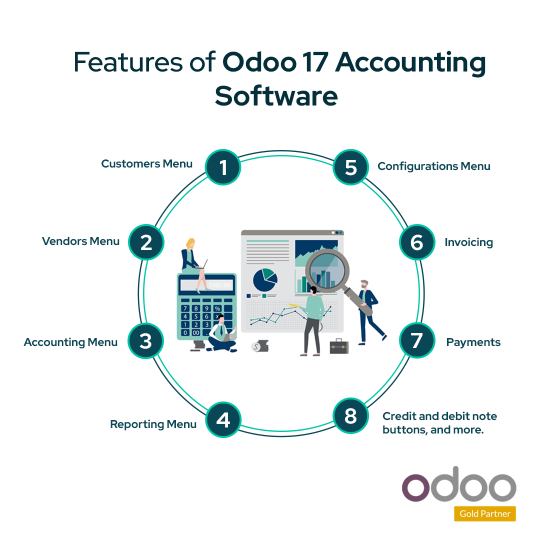
Customers Menu:
Invoice: You can create an invoice by choosing the customer, setting the reference, invoice date, payment terms, journal, and company. Then, select the product and finalise the invoice.
Credit Notes: These are documents issued by you (the vendor) to your customer, usually for returns or corrections on a previous invoice.
Receipts: This option lets you record the payments you receive from customers and update the accounting records.
Payments: Here, you can choose the type of payment for your customer, like cash, check, or credit.
Follow-up Reports: In many businesses, sales and purchases are often on credit. It’s important to collect these payments on time. Odoo ERP helps you identify customers with overdue payments and provides reports to follow up with them.
Products: You can create new products or view existing ones that you sell.
Customers: You can add new customers or view details of existing ones.
Vendors Menu:
Bill: You can create a new bill from a vendor, including details like the reference number, bill date, and more.
Refund: A refund is money returned from the original recipient (vendor) to the original payer (you).
Receipts: This is where you record receipts from vendors.
Payments: You can record payments made to your vendors.
Products: You can add new products or view the ones you purchase from vendors.
Vendors: You can add new vendors or view details of existing ones.
Accounting Menu:
Miscellaneous:
Journal Entries: This section includes all the financial records for every transaction within the company.
Journals:
Sales: Here, you can see all the records related to your sales, including details about the partners, invoice numbers, products in each invoice, and the amounts debited or credited.
Purchases: This section allows you to create and view all the purchase records for your organisation.
Bank & Cash: This displays all the records related to your bank and cash transactions.
Ledgers:
General Ledger: This shows all the financial transactions in your organisation, detailing every analysed account.
Partner Ledger: This ledger displays the current open balances with any customer or vendor.
Management:
Automatic Transfer: Here, you can set up automatic transfers for regular expenses, like monthly rent or yearly liabilities.
Assets: This helps you keep track of your fixed assets, such as machinery, land, and buildings.
Deferred Revenue: This section handles payments received in advance, which the company hasn’t yet earned.
Deferred Expenses: This is for expenses that the company has paid in advance but hasn’t yet used.
Action:
Reconciliation: This feature allows you to match payments to the corresponding invoices, ensuring that everything is correctly recorded.
Reporting Menu:
Generic Statements:
Profit and Loss: This report shows all your income and expenses over a certain period, giving you a clear picture of your profitability.
Balance Sheet: This statement shows what your company owns (assets), what it owes (liabilities), and the value left for shareholders (equity) at a specific point in time.
Executive Summary: This is a summary of your business plans and key financial reports, providing a quick overview of your company’s financial health.
Cash Flow Statement: This report explains how changes in your balance sheet and income affect your cash flow. It shows how money moves in and out of your business.
Partners Reports:
Partner Ledger: Here, you can see all the journal entries that have been posted, organised by partner (customer or vendor).
Aged Receivables: This report helps you check the financial health of your customers. It categorises receivables (money owed to you) based on how long they have been outstanding, helping you track overdue invoices.
Aged Payables: This report reminds you which invoices you owe are overdue for payment, helping you manage your payables efficiently.
Audit Reports: This includes several detailed financial reports:
General Ledger: A comprehensive list of all your financial transactions.
Trial Balance: A summary that ensures all your credits and debits are balanced.
Consolidated Journals: A combined report of all your journals.
Tax Reports: Details of all your tax transactions and liabilities.
Journal Audit: A review of your journal entries to ensure accuracy and compliance.
Assets Report: A detailed report on your company’s fixed assets.
Configurations Menu:
Invoicing:
Payment Terms: Set the conditions under which your customers should pay their invoices, such as due dates and installment plans.
Taxes: Manage the various taxes applicable to your sales and purchases.
Fiscal Positions: Adjust taxes and accounts for specific customers or regions.
Journal: Configure different journals for recording transactions.
Follow-up Level: Set up reminders and actions for following up on overdue invoices.
Payments:
Add a Bank Account: Set up new bank accounts for handling payments.
Bank Accounts: Manage and view all your existing bank accounts.
Saved Payment Data: Store and manage payment information for future transactions.
Payment Icons: Customise icons representing different payment methods.
Payment Transactions: Track and manage all your payment transactions.
Accounting:
Chart of Accounts: Define and manage the list of all accounts used in your company’s general ledger.
Journal Groups: Organise different journals into groups for better management.
Product Categories:��Categorse products for accounting purposes.
Reconciliation Models: Set up models to simplify the process of matching payments with invoices.
Account Tags: Create tags to categorise and filter accounts.
Account Group: Group similar accounts together for reporting purposes.
Asset Models: Manage models for tracking your fixed assets like machinery and buildings.
Deferred Revenue Models: Set up models for managing revenue that is received in advance.
Deferred Expense Models: Set up models for managing expenses that are paid in advance.
Management:
Tax Report: Generate and manage reports for all tax-related transactions.
Financial Reports: Create and manage various financial reports to monitor your company’s financial health.
Some more exceptional features of the Odoo ERP 17 Accounting module are:
Auto extract PDFs only: This feature focuses on automatically prioritising PDF attachments when creating invoices from emails for both sales and purchase records. It’s a highly requested feature in Odoo’s accounting system.
Auto-reconcile feature: A new tool has been introduced to automatically match transactions. This makes Odoo ERP more efficient for accounting and bookkeeping.
Bank reconciliation layout: The bank reconciliation interface has been updated for better clarity. You can now easily edit, delete, and print bank statements directly from the widget. Dashboard links and audit features have also been improved.
Bank statement PDF report layout: The design of the bank statement PDF reports has been cleaned up for easier analysis, making Odoo a top choice for accounting software.
Bills artificial intelligence: Odoo now always predicts taxes and accounts on vendor bill lines using AI. Product prediction can be turned on in the settings, making Odoo a standout in accounting software.
Branches management: You can now manage multiple business units or branches through a multi-company hierarchy, making Odoo easy to use for complex businesses.
Credit and debit note buttons: The invoice action buttons have been simplified. The debit notes option has been moved to the action menu. Odoo is also highly customisable and is one of the top cloud-based accounting software options.
Cross analytic: You can input data on multiple analytic plans for cross-reporting, a crucial feature for detailed accounting and bookkeeping.
Credit limit improvement: Confirmed and uninvoiced sales orders are now included in a partner’s total receivables. This helps better manage credit limits by considering all pending amounts.
Revenue report: The report allows you to audit deferred amounts, showing any differences between theoretical and actual entries, indicating if manual adjustments are needed.
Deferred management: Managing deferred revenues and expenses is now separated from assets, allowing you to create them without pre-setting deferred models. This makes Odoo even more versatile.
Delivery date: Invoices now have a standard field for the delivery date, enhancing Odoo’s functionality as a top accounting software.
Down payment and POS: The tax and account details on down payment invoices remain consistent, whether they are created through the Point of Sale system or the Sales App.
Down payments tax breakdown: The tax breakdown on down payment invoices now aligns with the original sales order, ensuring accuracy in financial records.
Now let’s see how Odoo 17 connects its Accounting module with other module of the ERP:
1. Manufacturing:
Production Orders: When you create a production order, Odoo’s Accounting module automatically records the use of raw materials and work-in-progress.
Bills of Materials (BOMs): The costs of materials listed in the BOM are factored into the production order’s cost calculations, affecting the accounting records.
Manufacturing Completed: When production orders are completed, journal entries are made for finished goods inventory and production overhead costs.
2. Inventory:
Purchase Orders: Confirming a purchase order creates a record of what you owe (accounts payable). Receiving goods adds them to inventory and updates accounts payable.
Delivery Orders: When you move goods out of inventory for sales or internal use, journal entries are made reflecting the change in inventory and related costs.
Inventory Adjustments: Any changes to inventory levels, like write-offs or adjustments, are recorded in the accounting module.
3. Payroll:
Salary Calculations: Payroll processing generates entries for salaries, deductions, and employer contributions.
Payslips: Employee payslips detail earnings and deductions, which are recorded in the accounting module.
4. Sales:
Sales Orders: Confirmed sales orders create entries for customer receivables and deferred revenue.
Delivery Orders: When goods are delivered against sales orders, entries reflect changes in inventory and customer receivables.
Invoices: Creating invoices records sales revenue and customer receivables. Customer payments update bank and receivable accounts.
5. Purchase:
Purchase Orders: Confirmed purchase orders generate entries for accounts payable. Receiving goods updates inventory and accounts payable.
Bills: Recording bills from vendors updates accounts payable and relevant expense accounts. Paying bills updates bank and payable accounts.
How These Links Create Journal Entries?
Each action in these modules triggers predefined accounting rules in Odoo ERP.
These rules automatically generate journal entries, updating the relevant accounts based on Odoo’s chart of accounts.
Benefits of Odoo Accounting Integration:
Real-time Data: Accounting records reflect real-time data from all connected modules, reducing manual data entry and errors.
Accurate Reporting: Automated financial reports provide a clear view of your financial health.
Improved Efficiency: Streamlined workflows and automated entries save time and resources for your accounting team.
Click here to also know about
“Explore the Features and Benefits of the Odoo Inventory Management Software”
Wrapping Up
Odoo 17’s Accounting module serves as the central hub, integrating seamlessly with other functions to automate financial processes, ensure accuracy, and support informed decision-making.
Being an official Odoo gold partner in Australia, we at Envertis, ensure to offer comprehensive Odoo ERP development services for various business needs. We have successfully completed numerous ERP projects for startups and small-to-medium businesses worldwide. For more information, contact us at [email protected]
#odoo#odoo development company#odoo development australia#odoo erp development#erp#odoo erp#odoo erp software#odoo implementation#odoo implementation company#odoo development
0 notes
Text
Mastering Odoo Development: Tips and Tricks from the Odoo Development Cookbook

Are you looking to enhance your Odoo development skills? Whether you're a seasoned developer or just starting out, mastering Odoo can open up a world of opportunities for creating powerful and customizable business applications. Here, I'll share some expert tips and tricks from the "Odoo Development Cookbook" to help you become an Odoo pro.
1. Understanding the Odoo Framework
Odoo is built on a robust framework that combines Python for the backend and JavaScript for the frontend. Familiarizing yourself with the framework’s architecture is crucial. Here are a few key components to focus on:
Models: These are the foundation of your application, defining the structure of your data.
Views: These determine how the data is presented to the user.
Controllers: These manage the logic and flow of your application.
2. Effective Module Creation
Creating modules is a core aspect of Odoo development. Here’s how to make your modules efficient and maintainable:
Modular Design: Break down functionalities into smaller, reusable modules.
Naming Conventions: Use clear and consistent naming conventions for your modules, models, and fields.
Documentation: Document your code and modules thoroughly to ensure they are easy to understand and maintain.
3. Harnessing the Power of XML
XML is used extensively in Odoo for defining views, menus, and actions. Mastering XML can significantly improve your development workflow:
Views Customization: Customize list views, form views, and search views using XML to enhance user experience.
Inheritance: Use XML inheritance to extend and modify existing views without altering the original code.
4. Advanced ORM Techniques
Odoo’s Object-Relational Mapping (ORM) allows you to interact with the database using Python objects. Here are some advanced ORM techniques:
Computed Fields: Use computed fields to dynamically calculate values based on other fields.
SQL Constraints: Implement SQL constraints for data integrity and validation.
Record Rules: Define record rules for fine-grained access control and security.
5. Optimizing Performance
Performance optimization is essential for ensuring your Odoo applications run smoothly:
Indexing: Use database indexing to speed up query performance.
Batch Processing: Process records in batches to minimize resource usage.
Caching: Implement caching mechanisms to reduce server load and improve response times.
6. Debugging and Testing
Effective debugging and testing are crucial for delivering high-quality Odoo applications:
Logging: Utilize Odoo’s logging features to track down issues and monitor application performance.
Unit Testing: Write unit tests for your modules to ensure they work as expected.
QWeb Debugging: Use QWeb debugging tools to troubleshoot issues in your templates and views.
7. Staying Updated
Odoo is constantly evolving, with new features and updates being released regularly. Stay updated with the latest developments by:
Following the Community: Join Odoo forums, mailing lists, and community events.
Reading the Documentation: Regularly review the official Odoo documentation and release notes.
Contributing to OCA: Get involved with the Odoo Community Association (OCA) to contribute and learn from others.
By mastering these tips and tricks from the "Odoo Development Cookbook," you’ll be well on your way to becoming an expert Odoo developer. Keep experimenting, stay curious, and don’t be afraid to dive deep into the framework’s capabilities. Happy coding!
0 notes
Link
Odoo Server Action
#odoo13#Odoo Customization#odoo#Odoo Implementation#odoo tutorial#Odoo Tips#Learn Odoo#learn openerp#openerp#Open ERP implementation#openerp tutorial#odoo open erp#odoo menu#odoo action menu#odoo server action#ir.actions.server#ir.actions.act_window#<field name=code>#Search Results Web results How to filter records for tree view based on logged in user#Allow a user to access only records that were created by him#Actions with domain by user's company
0 notes
Text
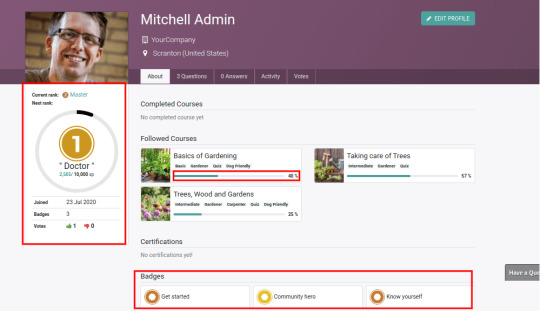
E-Learning Module In Odoo | CandidRoot Solutions
How Odoo e-Learning Helps Your Business
E-learning Module introduced in Odoo version 13. It provides opportunities for creating online courses, Enabling the users to join and complete the online course with rules configured while creating the course.
This module also provides some features like configure quizzes, badges, Beautiful dashboard for currently logged in users, Status of courses which he or she joined, badges, Rank and user profile information.
Overview of E-learning Module Feature :
· ‘Karma Points’ bases on Rules
· Check Number of Views in Course
· Add quizzes for each lesson
· Reward points based on the number of attempts
· Flexibility to add multiple lessons in each course
· Extended Leader-board
· Latest achievements
Let’s discuss in detail about the Odoo E-learning module.
First step is to Install e-learning module from apps,
Creating Course
E-learning → Courses → Create
Once you install the module and go to the e-Learning Module you can see the e-Learning Overview. From here users can create or edit existing channels or courses.
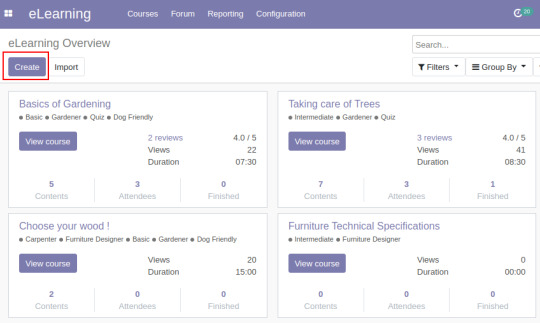
User can give title of Course and add content or lessons to that course
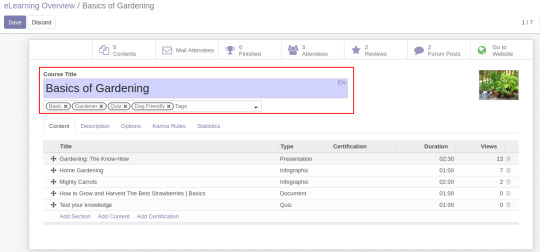
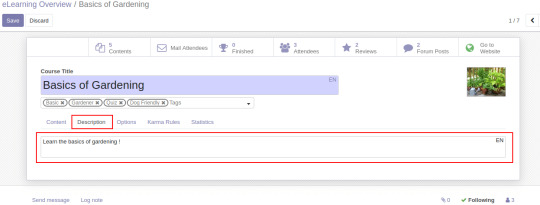
Description Tab is to define description of that course
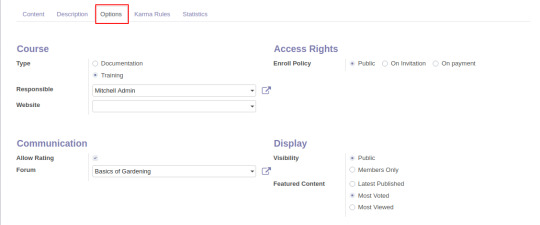
Options Tab :
User can configure Course Type, Enroll Policy, Responsible, Websites, Allow Ratings, Forum, Visibility and Featured Content.
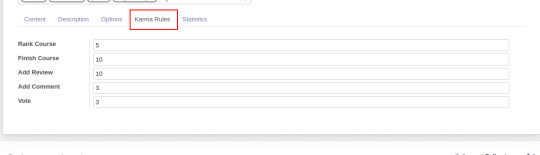
Karma Rules :
Users can set the rewards points based on particular action
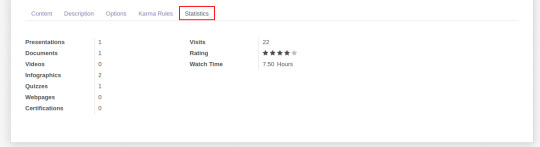
Statistics :
It gives statistics about that course about presentation, videos, Documents, Watch time etc
Adding Contents or Lessons to Course
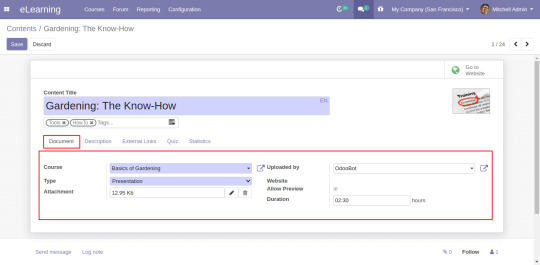
e-Learning → Courses → Contents
· Define title for content
· Users can add presentations, Info-graphics, Video, Web-pages, Quiz, Certification etc.
· In the Document sections other fields like Course, Type, Attachment, Uploaded By, Website Preview Allow, Duration etc
External Links Tab :
Users can add titles and external links of content which will help students or visitors to learn much better about the subject or link related to the content.

Quiz Tab :
Here users can define rules, Marks as per attempt and Questions and its correct answers for quiz.
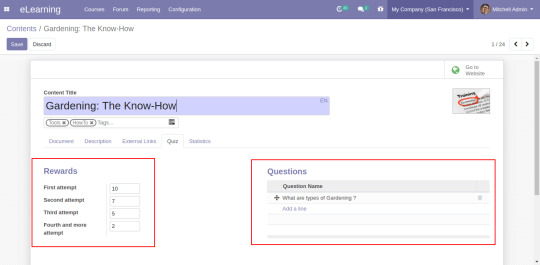
Click on Add a line to add new questions, Users can add Questions with multiple choices and define correct answer for that question.

Viewing Courses On Website
Website → Courses
Now visitors can check courses from the website by clicking on the “Courses” Menu from the website.
Users can join in any course by clicking on the Pick a course button.
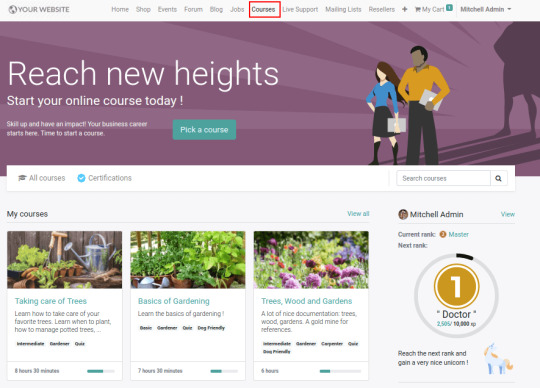
Users can click on the My Courses button to see their picked courses and there are some filters like Your Level, Your Role, Tags etc as per configured from backend.
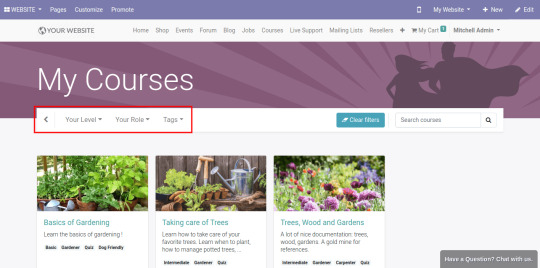
Select any course from the website and start learning it.
· Users can give reviews for this course
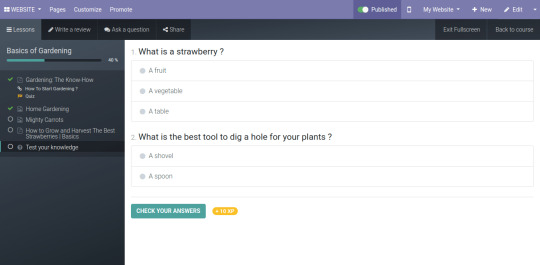
· Forum to Questions and Answer about that course
· Quiz attempt after learning from the course.
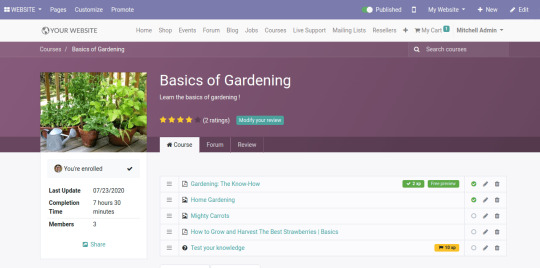
From Home Tab of the Courses, User can view dashboard which will give activity status of logged in user including current rank, Next Rank, Badges etc
·
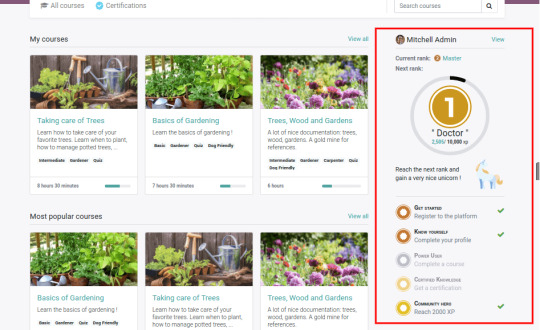
Click on the “View” button, You can see the profile of the user, Courses and completion percentage of the joined courses, Badges of user etc
·
Conclusion :
Hope you got an idea about the E-Learning module of Odoo and find the features of the E-learning Module in Odoo 13 amazing ! CandidRoot, Odoo Service Provider Company is always ready to help you for Implementation of E-Learning Or Learning Management System (LMS) for your business by providing various Odoo services like Odoo implementation, Odoo integration, Odoo Customization, and much more.
#e-learning in odoo#e-learning in odoo 13#odoo 13 e-learning#e-learning module in odoo 13#odoo e-learning#online courses#e-learning module
0 notes
Text
Nine Reasons to Upgrade to Odoo 14
If Odoo 13 was faster than all its older version; Odoo 14 is the fastest of all.
If you are having second thoughts about upgrading to Odoo 14, then read ahead; it might change your mind.
Where the major focus was on making Odoo 13 faster and developing new apps for complex business needs, Odoo 14 stands out with its smart business intelligence and brand-new website builder.
In Odoo 13 the main focus was on HR, Accounting, Field Service apps; whereas Odoo 14 has focused on improvising Inventory, MRP, Website, POS.
Let’s get to know about nine compelling features of Odoo 14 that are enough to inspire you to upgrade to Odoo 14.
1. Create new Feature
This feature was not available in the older versions of Odoo, “Create New” option occurs when anyone tries to input an entry while creating a product, contact, etc.
2. Sales Module:
Odoo 14 brings a new feature in the sales module i.e. “Next Activity”; it showcases the stage of the Sales Order. One can easily check the next activity for a particular sales order from the list view, and based on the activity quicker actions could be taken.
Product Price List Report option in the Sales module lets the users print the price list of the product with corresponding currency fetched from the product list itself.
3. Purchase Module:
Key Performance Indicator is available on the Dashboard of purchase Module for Individual login User.
Receipt Reminder in the purchase module of Odoo 14 automatically reminds the data or date of receipt for a particular vendor.
4. Re-capture Option:
Odoo 14 has brought this new feature that can control illegal website attacks of data filling in the contact form.
5. Expenses App
The new dashboard for the Expenses module lets you see the status, next activity for respective expenses. Also, at the top of the dashboard, you can see the overview of total Expenses.
6. Manufacturing App
Now, the manufacturing orders come with labeling, so one can know the status of every stage.
In Odoo 14’s work order dashboard, you can edit the stages of respective operations as “Done”, “Start”, or “Pause”.
Now managing inventory and stock-outs are easy as you upgrade to Odoo 14, it allows the user to run the scheduler in the Planning menu of the Manufacturing app to identify the product quantity.
“Lock Quantities” feature is very useful for Manager/Supervisor as due to this Manufacturing Orders will not be updated until Manager/Supervisor validates the count of manufacturing the product.
So, once MO is created it cannot be updated in between/before the process until Manager/Supervisor validates the updated count of product.
7. POS
Upgrade to Odoo 14 as the POS Promotion and Coupon program are moved to the Odoo 14 Community Edition.
Many new features are also added for POS Inventory Management.
8. Data Cleaning
It is one of the new modules that has been introduced in the Odoo 14 Enterprise edition, it removes duplicate data in order to reduce data redundancy.
9. Upgrade to Odoo 14 Website App
Odoo 14 brings up a new chart snippet tool where one can organize and represent numerical or qualitative data in graphical data charts on the website.
Countdown Snippet on the website allows users to showcase increase or manage their product sales/ traffic in the e-commerce business.
Step Snippet can analyze the milestone steps for delivery or user activity on the website model.
Product Catalog Snippet in Odoo 14’s website module allows users to make changes in predefined templates as per needs.
Auto Pop Snippet has been added to Odoo 14 website app to help customers get quick assistance with offers and promotions available on your website.
Progress bar Snippet lets you see the progress chart of various activities on your website.
Timeline Snippet lets you create a timeline of a company/products’ evolvement on the website module.
Number Snippet has been added to the website module to let you showcase your USPs on the website.
Product List Item Snippet lets you list the products easily on your website.
Odoo 14 and its features will only help you grow faster while being as productive as ever. In case if you want to upgrade to Odoo 14, you are just a tap away from getting a free consultation from certified consultants and developers.
Note: This blog was originally published here: https://www.aktivsoftware.com/nine-reasons-to-upgrade-to-odoo-14/
Thank you.
0 notes
Text
Allure Backend Theme (For Community Edition)
Allure Odoo Flexible, Powerful Backend Theme

Allure is Flexible, Powerful Odoo Backend theme available for Odoo V13 Community. While developing this theme, we had given more working space for users with great look & feel and with ultimate UX. Along with this we had focused on Odoo ERP users, we provided flexibility to choose different operational functions from user to user.
FEATURES:
More work area for the Odoo ERP usersFlexibility from User to user to choose function that they like.
Desktop Menu to choose icon from 2D, 3D,Favourite bar: Flexibility to jump next app with single clickFlexibility to choose Night Mode/light mode/regular modeFlexibility to choose linear view or horizontal tab view just like OdooFlexibility for users to choose fontsFlexibility of Fuzzy search helps for quick jump to an appMenu's Tree view display of menu & submenu for simple & clear viewFlexibility to choose Display Density in all list viewFlexibility to choose from regular view and full screen viewFlexibility with fully responsive, work smooth with laptop, tablet and mobile devices
Allure look & feel and user experience
1) During the development of Allure Backend theme we had focused on the users, user work area and their ease while using Odoo ERP. We had elevated the user work area, user experience with providing flexibility to the user to reducing clicks like for switching from one app to other app with 'Favourite bar' menu. Further more provided flexibility to User to users by choosing different theme colours, fonts, apps icons, favourite apps on it's bar, a night mode, Display density for list view and many more.
2) In-depth customization is implemented on Menu bar, Submenu bar, Control Panel, List view, Search option layout, Form view action buttons, Dashboard, Kanban View, List View, Form View, Graph View, Pivot View, General View, Calendar View, Planner view, Chat Panel and many more.
3) The List view is more smoothing and also for kanban view. List view with Display density with 3 options is implemented in this theme for all modules. It becomes more relaxing for the user to operate.
4) In Search functionality, Filter, Group by and Favorites has been provided on right slide bar, with tick box option, which does not obstruct the screen as seen in standard Odoo.
5) In Allure backend theme the has flexibility to choose from horizontal tab bar & vertical tab in Form View, it becomes easier for the operator or the user to fill-in the data, when more data is to be fetched into the system.
6) As in standard Odoo view the users' are not comfortable to use the chatter functionality, because they have to scroll down to use the chatter functionality. But in Allure backend theme a chatter button is provided, as the user clicks on it, the chatter window slides-in from right side. The user can chat with the concern person and simultaneously fill-in the data in the form. In standard Odoo the user cannot use both the functionality at the same time.
7) The flexible, powerful, clean, responsive backend UI is maintained throughout the ERP. With full screan facility, the user area is wide with bigger form input area, view area, reporting area, clean dashboard with inner pages for all ERP users.
8) As our backend theme gives fresh user interface, with more flexibiity has elevated looks with larger work area your client won't be able to realize that Odoo is working in background. It makes you feel as if, you or your client is using independent ERP system.
For Customization, New Development, Migration, Training of any OpenERP (Odoo) apps, you can CONTACT US on:
Store:- https://store.synconics.com/
Website:- https://www.synconics.com/
WhatsApp:- (+91) 942-686-4274
E-mail: [email protected]
Skype: synconics.technologies
0 notes
Text
7 MUST-HAVES TO LAUNCH AN E-COMMERCE WEBSITE
In these COVID-19 times, quarantine is a significant reason to begin selling online right away. Your brand doesn’t have an E-Commerce Website yet? Begin E-Commerce Website Development from scratch because the digital selling industry is growing like never before, considering the recent wakes of the world.
The coronavirus outbreak has influenced the Dynamics E-Commerce demand a lot. Amazon, which is a footnote in the history of E-Commerce, is now hiring 100,000 new employees. All of which will be involved in Odoo Inventory and Supply Chain Management, along with shipment operations.
Besides, Magento – An Adobe Company has announced a support plan for small and medium-sized businesses that want to move online with Magento E-Commerce Development. Here’s a list of things the company offers for FREE;
FREE Magento Commerce and Marketo Engage for 3 Months
3 Months of FREE Magento University and Marketo University
90 Days of FREE Adobe Connect – up to 25 participants
Adobe Portfolio
Acrobat PDF
Adobe Talent
So, with this pack of FREE offerings, now is unquestionably the time to grow from a brick-and-mortar store to an online store. However, launching a Dynamics 365 E-Commerce store isn’t an easy play. Hence, in this article, we’ve covered some essential things you need to tick-off from the checklist as you sit down, power up, and begin building.
1. Analyzing Target Audience and Market
The initial thing to know is your target audience. There is a possibility that you are selling baby food to bachelors and umbrellas in areas which have never sighted rain. Hence, you need to analyze your market, and the audience interested in your product, otherwise, you will not stand a chance.
Are you a brand selling everything, from clothes to groceries? Begin with things like your product’s ingredients, the cloth fabric, and the environment friendly products that speak GO-GREEN. Precisely, these are the things your target audience wants to hear and relate to, and they’re the reason behind them buying your product. We’ve attached a snapshot of a brand showing its baby food products to parents who are extra careful about what their child consumes.
Besides, who are the ones that have a problem your products can serve? Begin with demographics like age, culture, gender, earnings level, etc., and combine these with other lifestyle-type characters.
A lifestyle characteristic record bases on three foremost subjects – actions, interests, and ideas. Precisely, if you can reach the root of what your target audience prefers to do, what they are enthusiastic about, and how they think about material things they need in life, you have found your word and tone.
In a few cases, it will be formal to provide to a more distinguished profile clientele, or more casual to dive in for a higher market share in a concise area.
However, in every way, it is essential to keep your target in mind at every step of E-Commerce Website planning. And with this, we mean EVERYTHING. Including things as simple as a domain name or logo design while creating a content strategy.
2. Choosing the Right Domain Name
Deciding on the appropriate Domain Name for an online store is not as easy as naming a child. Yes, its that much of a tech-task. Before you begin thinking of a domain name, make sure that you keep it short, memorable, and unique. However, there is a lot that can go wrong while deciding on one. For instance, a domain name with a double meaning that might gather you some unwanted attention.
Moreover, deciding on the domain on which you want to register your website is also a significant task. Here are some types of domains you can choose from;
Global Domains – .com, .net, .org
Domestic Domains – .fr, .us, .uk
Activity Domains – .photography, .shop, .guru
So as soon as you decide on your Domain Name, your first step should be registering your E-Commerce Website on any of these domains to make sure that no one else hits you the punch.
Technically, the domain of an E-Commerce Website is one of those factors that rank it higher on Google SERPs. And unfortunately, or say fairly, on unique names get the SEO Services advantage.
Hence, it is usually safer to avoid names that appear like existing ones to organically rank higher, and not perceive as a knock-off of another business. Plus, the unique title will most probably rank higher anyhow, so you will not be doing favors for yourself.
3. The Importance of SSL and HTTPs
Every time anyone uses their credit card and bank account details online, a potential opportunity of making that information made readily available for access to more than intended recipients.
Hence, to be safe from scams, and to keep customer information secure, Websites Need SSL and HTTPs. The SSL certificate is a type of encryption contract that ensures the accessibility of information between service providers and their end-users.
Secure websites are more obvious to recognize because their address begins with HTTPS, where the S stands for SECURE. On the other hand, we have the classic – HTTP, to which the browser reacts and notifies the users of the site not being secure.
In some scenarios, there is an option of utilizing the color-coding scheme in which the browsing bar turns green, swearing high-level security. However, this is not the only practical way to measure how secure a website is. Hence, to keep everything precise, SSL certificates are sold recurring bundles, to ensure a smooth blow at the back-end.
Today, the buyers are savvier than ever. So if you are thinking that they will miss out on this information when they are shopping, you are wrong. There is no reason to scrimp on the security encryption. Honestly, no business should risk on non-secure customer data and smash the trust. Here’s a snapshot of what you will see when you click on the lock icon beside the URL on your browser.
4. Web Store Structure
Magento 2 store view enables business to manage several website views under a single installation, which they can control from one Admin Panel; to keep things simple and easy on hands.
Moreover, these multiple websites can have similar layouts and highlights or be unique. And if you want to have multilingual versions of your website, there are two ways to do so;
Separate domain for every Language Version
Single domain with multiple Store Views
5. Mapping a Catalog Structure
One of the best ways to strategically manage your E-Commerce Website is by thinking of it as a hierarchical tree. The site Menu is the navigation map that customers click on to find what they are looking to buy. Hence, it should be precise and understandable. In our years on experience as a Web Development Company, we came across web stores that had pages that were not concise about what products and services it offers. And unfortunately, that is not good for the audience involved.
Hence, as a quick step, consider in your mind a structure of how your catalog should look. Because this way, your mind map will work together with your visuals to place important things closer to your audience on the Homepage.
Later, you can classify other products and services by varieties as required for your target audience. However, make sure that they operate no more than thrice, deep in the menu. Why? This point is critical for UX because no one has the time to keep clicking around and hop from one page to another to locate the information they need. And not only for the interest of your website visitors, but this will also influence your SEO Services in Lahore and conversions. Yes, these are the things the search engine beasts, aka Google Bots, use to make or break your digital presence. On a final note, we’d suggest, go through this article – E-Commerce Product Catalog Management: 8 Best Practices, to learn more about how product cataloging works best.
6. Text and Visual Content
Ever seen a Web Store without content, product images, or product descriptions? There doesn’t exist any. So after you have trailed down through all the previously mentioned steps, begin preparing your Product Images. And if you don’t have any, we’d suggest, click a new picture of them, ensuring accuracy and high-quality resolution. At this point, you might need some help from professionals providing Branding and Graphic Designing Services.
Next, put your thoughts and words into writing Product Descriptions. Considering that this is one area that brands don’t realize is powerful, this might get you a competitive edge over others and influence your conversion rates. Technically speaking, these descriptions are your salesperson. Hence, answer every question you think a customer might ask about a product in an organized way, and let the product descriptions do the talking. Plus, if you need some help with nailing your product descriptions, read our previous article – 5 Product Description Mistakes That Drive Buyers Away.
Last but not least – Decide if you want to have a blog on your Web Store, considering that it will affect your general Digital Media Marketing plan, SEO Services, and technical Digital Services. And if your answer is a YES, let us know about how you plan to drive valuable visitors to your E-Store with the help of blogs.
7. Shipping and Billing Gateways
No buying process ends without payments and shipments, be it in-store, or online retail. So while you are setting up a Web Store, you need to look out for payment gateways that are available in the countries where you will be selling. Here’s a pro-tip; Don’t rush at this point because the payment gateway you choose directly influences your ROI. Look for options, compare them, and pick the one that profits. And if you need some help with integrating these gateways with your Web Store, get in touch with Xcentric Services. We provide E-Commerce Platform Integration Services that ensure compatibility and smooth processing.
Next, decide on the countries where you will be shipping your products. Ask yourself a few questions like;
How much will it cost to ship to a specific country?
Is my E-Store compatible with shipping to these countries?
Will we provide the shipping for FREE?
Analyze the answers to these questions and find out a technical solution to them all. And once you have decided on the countries you will be shipping to, make sure that the customers from there can view all the necessary APIs when they place an order. The APIs include costs, estimated delivery time, and all the regulations specifying each country where you will ship.
Final Note
Now that you have gone through all must-haves of launching an E-Commerce Website, we assume that you are overwhelmed with the heaps of decisions you have to make. But don’t worry, we’re a Web Development Company in Lahore, providing Magento E-Commerce Development Services. Get in touch with us and let us give your business a new digital face.
0 notes
Text
How to Customize Odoo Without Coding: A Beginner’s Guide

In today’s fast-paced business world, customization is key. Odoo, an all-in-one business management software, offers a range of tools that allow you to tailor your system to your exact needs without writing a single line of code. In this beginner’s guide, we’ll show you how to customize Odoo easily using Odoo Studio and its built-in tools. Whether you’re new to Odoo or looking for a hassle-free way to improve your workflows, this guide is designed to help you get started.
Why Customize Odoo Without Coding?

Customizing Odoo without coding is perfect for businesses that want flexibility but lack technical resources. With no coding required, you can:
Save Time: Implement changes quickly without waiting for developers.
Reduce Costs: Avoid the expenses associated with custom software development.
Empower Your Team: Enable non-technical staff to modify workflows and reports.
Stay Agile: Easily adapt to changing business needs with real-time updates.
By leveraging the built-in customization features, you can improve efficiency and tailor the platform to your unique requirements—all without needing to write any code.
How to Customize Odoo Without Coding Using Odoo Studio
Here are the easiest ways to customize Odoo without coding:
1. Use Odoo Studio
Odoo Studio is a drag-and-drop tool that allows you to customize Odoo easily. Here’s what you can do with it:
Create and Modify Forms: Add or remove fields without coding.
Customize Workflows: Automate approvals and set conditions for actions.
Design Custom Reports: Change the appearance and layout of reports.
Personalize Menus and Dashboards: Organize navigation to improve usability.
To access Odoo Studio, simply enable it from the apps list and start making changes effortlessly.
2. Add Custom Fields
Odoo allows users to add custom fields to forms without modifying the source code. You can:
Add new fields in Settings > Technical > Database Structure.
Choose from field types like text, numbers, dropdowns, and checkboxes.
Define default values and visibility settings to improve user experience.
3. Modify Views
Odoo provides a way to modify views using XML-based options in the UI. With the developer mode enabled, you can:
Rearrange fields and sections in forms.
Change the way lists and kanban views appear.
Hide or show fields based on conditions.
4. Customize Reports
Reports in Odoo can be tailored using the Odoo Studio Report Designer. Without coding, you can:
Add company logos and branding.
Modify invoice templates.
Adjust layout and font styles to match your business identity.
5. Set Up Automated Actions
Odoo provides a rules-based automation tool to eliminate repetitive tasks. Using this feature, you can:
Auto-assign leads to specific salespersons.
Send notifications for approvals and order updates.
Trigger actions based on conditions (e.g., sending reminders for overdue payments).
6. Use Odoo Apps & Marketplace
If you need extra functionality, explore the Odoo App Store, where you can find ready-made modules for additional features. Simply install them without any coding.
Utilizing Built-In Customization Tools

Beyond Odoo Studio, the platform comes with several built-in tools to enhance customization without the need for coding:
Automated Actions and Workflows
Set up triggers and automated actions to streamline your operations.
Customize notifications and alerts to keep your team informed and efficient.
Reporting and Dashboards
Create custom dashboards to visualize key performance indicators (KPIs).
Tailor reports to display the data that matters most to your business.
User Access and Security
Define user roles and permissions to ensure data security.
Customize access rights without altering the underlying code, making it safe and manageable.
Tips for a Smooth Customization Process
Here are some expert tips to ensure you get the most out of Odoo customization:
Start Small: Begin with minor tweaks to get comfortable with the interface before moving on to larger changes.
Use Documentation: Leverage Odoo’s comprehensive documentation and community forums to learn best practices.
Test Changes: Always test your modifications in a safe environment before applying them to your live system.
Keep It Organized: Document your changes to maintain clarity and ease future modifications.
Stay Updated: Odoo frequently releases updates—make sure your customizations are compatible with the latest version.
Benefits of Customizing Odoo Without Coding
Faster Implementation: No need to wait for developers.
Cost Savings: Reduce IT and development costs.
Better User Experience: Customize Odoo to match employees' workflow.
Scalability: Make adjustments as your business grows.
Conclusion
Customizing Odoo without coding is a game-changer for businesses looking to enhance their operational efficiency and tailor their software to their needs. With tools like Odoo Studio and the platform’s built-in customization features, you can achieve a personalized system quickly and cost-effectively. Embrace these tools to empower your team, streamline processes, and drive your business forward.
Contact Us
For more expert advice and tailored solutions for your Odoo customization needs, get in touch with us at Odiware:
Phone: +91 86608 65440
Email: [email protected]
Website: www.odiware.com
Let us help you make the most of Odoo—without any coding required!
0 notes
Video
youtube
Window Actions in Odoo 13
Window actions (ir.actions.act_window) are the most common action types. It is used to present the visualization of the data models through different types of views. It gives instructions to the GUI client and is usually used by menu items or buttons in views.
0 notes
Text
Creating Server Actions in Odoo 13
Server actions like creating a record, executing several actions, etc. can enable customers to meet their requirements in Odoo 13. So, let’s understand this functionality in detail and how to use various parameters in server actions accordingly.

Before we proceed to discuss all server actions in detail, it is important to understand what server actions actually are.
Server Actions: Definitions and Types
Server actions are actions that can be executed automatically. As an Odoo admin, under the ‘Technical’ menu comes the Actions -> Server Actions option. However, for the ‘Technical’ menu to be visible, you need to activate the ‘Developer’ mode first.
To activate the ‘Developer’ mode, refer to this screenshot.
If you use any Odoo 13 theme or app, you can define a server action for a complex and long task like “Product Website Published.”
There are two ways to create a server action.
- Using code
- Using user interface (GUI)
Below are some available server actions:
- Update the record
- Create a new record
- Execute Python code
- Execute several actions
- Send Email
- Add Followers
- Create the next activity
- Send SMS
Though all of these server actions are quite important, one of the server actions that you often need to create is ‘Update the Record’. Let’s understand this server action in detail and how to use it.
Following that, we will explain the rest of the server actions in brief as well.
Update the Record
Let’s take a real-life scenario to understand the use of this server action.
If you handle a website that has lots of products and wish to publish all the products in one go, you can simply define a server action with “Update the Record”.
Now, create a record for ‘Server Actions’.
Add the following details:
- Model - Model linked to the action
- Action to do - Select the action ‘Update the Record’
- Feld - Specify the field you need to update.
- Evaluation Type - This is the type to be updated and is of three types - value, reference and python expression
- Value - It specifies the ‘Value’ field as a literal value.
- Reference - Allows you to select the existing values in the ‘Record’ field.
- Python - The ‘Value’ field is interpreted as a ‘Python’ expression.
Now add your server action to the related object via the ‘Create Contextual Action’ button. After you add this button, you will see that the menu appears under the ‘Action’ button of the related objects. In this case, the related object will be “Products”.
Below are the several other types of server actions that you can create similarly:
Send Email: Using this server action, you can send emails to your partners.
Add Followers: Using this server action, you can add followers and channels.
Execute Python: Using this server action, you can execute a block of python code.
Send SMS/Text Message: Using this server action, you can send text messages in bulk to your business partners and customers.
Create Next Activity: Using this server action, you can create the next activity. For instance, if you have a meeting with a client, you can create an activity ‘Meeting’ and specify its due date.
Execute Several Actions: Using this server action, you can perform several server actions at a time.
Create a New Record: Using this server action, you can create a new record. But for that, you need to specify the model you want to create the record in.
In a Nutshell
Defining server actions in an Odoo 13 theme or app helps users create or update a record, create an activity, etc. enabling them to meet their requirements.
Source Link : https://www.appjetty.com/blog/creating-server-actions-in-odoo-13-theme
0 notes
Text
Boost Your Profits By Choosing Right Restaurant POS Software Solution!
Almost all of us would agree with the fact that making profits while running any business is a sign of successful business. And making any business profitable involves a lot of things like automating the system, integrating your business with right software solutions, taking the right decision at right time and many more. At the end, you must have a flawless, reliable and efficient system that can boost performance of your business and enhance its productivity.

When it comes to restaurant management, a quality POS system is required that guarantees smooth functioning right from serving the customers to making checkout faster and easier. By turning tables faster with the help of automated system, you will end up with increased revenue without sacrificing efficient customer service and food quality. But for all these things, you need to choose the most suitable Restaurant POS software solution for your business from numerous available solutions.
Before choosing any Restaurant POS solution, you must concentrate on top 3 features that can help your restaurant management easier. Those features are-
Being flexible and open to different choices:
Make sure the POS provider you choose is updated with latest technology and is open to different choices. Ask the vendor about the integration tools or API he chooses to link with POS systems for its streamline functioning. Besides that, enquire about the third-party applications and apps vendor uses with their Restaurant POS.
Able to control labor and food cost:
A Restaurant POS software must be able to track the employee hours, pay levels as well as other jobs. It should be versatile to offer integrated scheduling feature so that business volume can be planned and predicted properly while reducing errors.
Offers accurate analytics and reporting:
To record figures on your fingertips is quite critical and next to impossible. As a result, the POS you choose must be able to quickly and accurately deliver the reports whenever you need them. Right from customer data to detailed reports and analytics, everything should be under one roof providing accurate results.
Thus, being in this business you must be thinking about number of options that you can prefer for your business. But what if I say that there is readily open source solution available in the market that offers a number of flexible solutions with Restaurant POS. Isn't that great? Let's read further to know more about that.
All in One solution- Odoo Restaurant POS system:
Main Features:
Clear layout and easy table management on the floor
Easy table allocation and tracking the actions
Quick and easy glance at the menu items with proper menu description
Customize the orders before placing final order
Flexible billing solution. Let you split or merge two or more bills
Void bill generation in case of canceled orders
Multiple user login using unique session
Easy billing feature that supports multiple currency and payment methods
Easy report generation
Benefits:
Lower operational cost and maintenance charges
Quick analysis of popular selling product and prioritizing it
Guaranteed customer satisfaction
Flexible solution that helps you to grow, expand and add new things to the business
Accurate report generation with sales reports
Thus, this is how OpenERP/Odoo Restaurant POS can enhance your Restaurant Management Software and help you in many ways to increase profits of your business.If you wish to have
Restaurant Management System
or any such system, you can reach us at
In case of any query, do let us know your necessary concerns. We would appreciate your inputs and suggestions if you have any.
Resource:
#restaurant management software#pos restaurant software#restaurant pos software#restaurant management system#Odoo Restaurant POS Management System#OpenERP Restaurant POS Software
0 notes
Link
How to create Action Menu in Odoo
#Odoo Customization#odoo#Odoo Development#Odoo Implementation#odoo services#Learn Odoo#learn openerp#openerp#openerp tutorial#odoo tutorial#action menu in odoo#action#menu#ir.ui.action#ir.actions.act_window#ir.ui.menu#create Action Menu in Odoo
1 note
·
View note